Mode Setup

Order Modes
Here is where you configure how your WebApp can be used. You must choose one option but you can have any 2 or all 3 modes;
- At the table – this is to allow customers already in your venue to order items to be served at their table.
- Collection – customers can order meals and drinks to be collected from your venue at a specified time.
- Delivery – if you offer a delivery service customers can order and provide address details.
Each of the above modes has specific details that you’ll configure elsewhere in the Online Ordering Settings screen.
User Mode
Customers can order either as a guest, or they can sign up. If they sign up the system will remember their details so each time they order it will pre-fill the boxes for their name etc.
Approvals
You can configure the app so that when an order is received it has to be approved by a member of staff. This might be to ensure that you have appropriate stock, to monitor alcohol consumption or simply to give you a better idea of what’s being ordered. This can be set differently according to whether the customer has paid at the point of ordering. For example, you might set this to not required for pre-paid orders and required for unpaid orders, so as to avoid the possibility of prank or fake purchases.
Settings
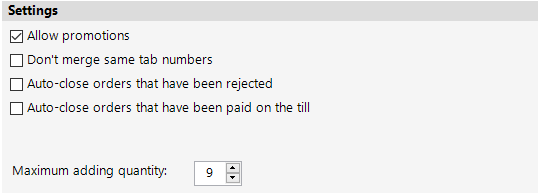
Allow Promotions
If you want online customers to be able to benefit from promotions you’re running, tick this box. You will also need to make sure that each individual promotion that you want online customers to benefit from is set to be available online.
Don’t Merge Same Tab Numbers
This applies to unpaid orders only. By default the system will assume that if two orders come in from the same table number that they’re for the same party and should be added to the same tab. If you are likely to have parties that share a table but wish to order and pay separately, you should tick this option.
Auto-close Orders That Have Been Rejected
If you have set orders to require approval, and you then reject an order, it will normally stay on the system so that you can view the details and contact the customer to let them know that you won’t be able to fulfil their request. If you always do this before rejecting an order you can tick this option.
Auto-close Orders That Have Been Paid On The Till
By default the tab created by an online (non-prepaid) order is treated separately to the order itself. Ticking this box means that as soon as the tab is paid on the till, the system will assume the order has been fulfilled and so will close the order alongside the tab.
Maximum Adding Quantity
You can limit the number of instances of any given item a customer can order online at any one time by setting a maximum value here. The default is 9 and highest possible limit is 99.
Card Payment Provider
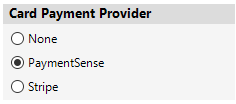
We provide two different options if you want your customers to pay when they order rather than on delivery/collection. PaymentSense is our card payment partner for card terminals, and they offer a parallel online payment service. Stripe is a stand-alone online payment service which is relatively simple to sign up to but is much more costly.
Notification of New Order
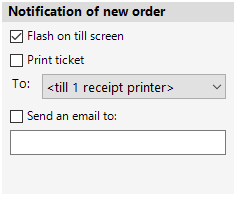
This section lets you decide how you’ll be notified of new orders coming in. You can select any or all of the options:
- Flash on till screen – the bar along the bottom of the till screen, where your site name and till number and shift number are normally shown, will flash red with the message that there are new online orders to review.
 The new order would also be added to the count shown on the ‘Online’ button on the left hand side.
 - Print ticket – a summary ticket like the one below will print on the selected printer.
 Send an email to – tick this option and enter a valid email address into the box below to have the system send an email whenever an order is received.
Customer Notifications
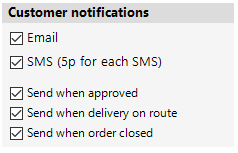
In this section you can set what form of notification customers will receive and at what stages of the process.
- Email – the system will email the customer using the address they are required to enter when ordering
- SMS – the system will generate a text message to the customer. Please note the charge applicable, which would be added to your monthly invoice from us.
- Send when approved – this will let the customer know that their order will be fulfilled
- Send when delivery on route – this will advise the customer that the driver is on their way
- Send when order closed – this will ensure that any mistakes can be rectified should a customer not have received their order.
