The Membership Report Generator is a powerful tool that allows you to create lists of members according to various criteria.
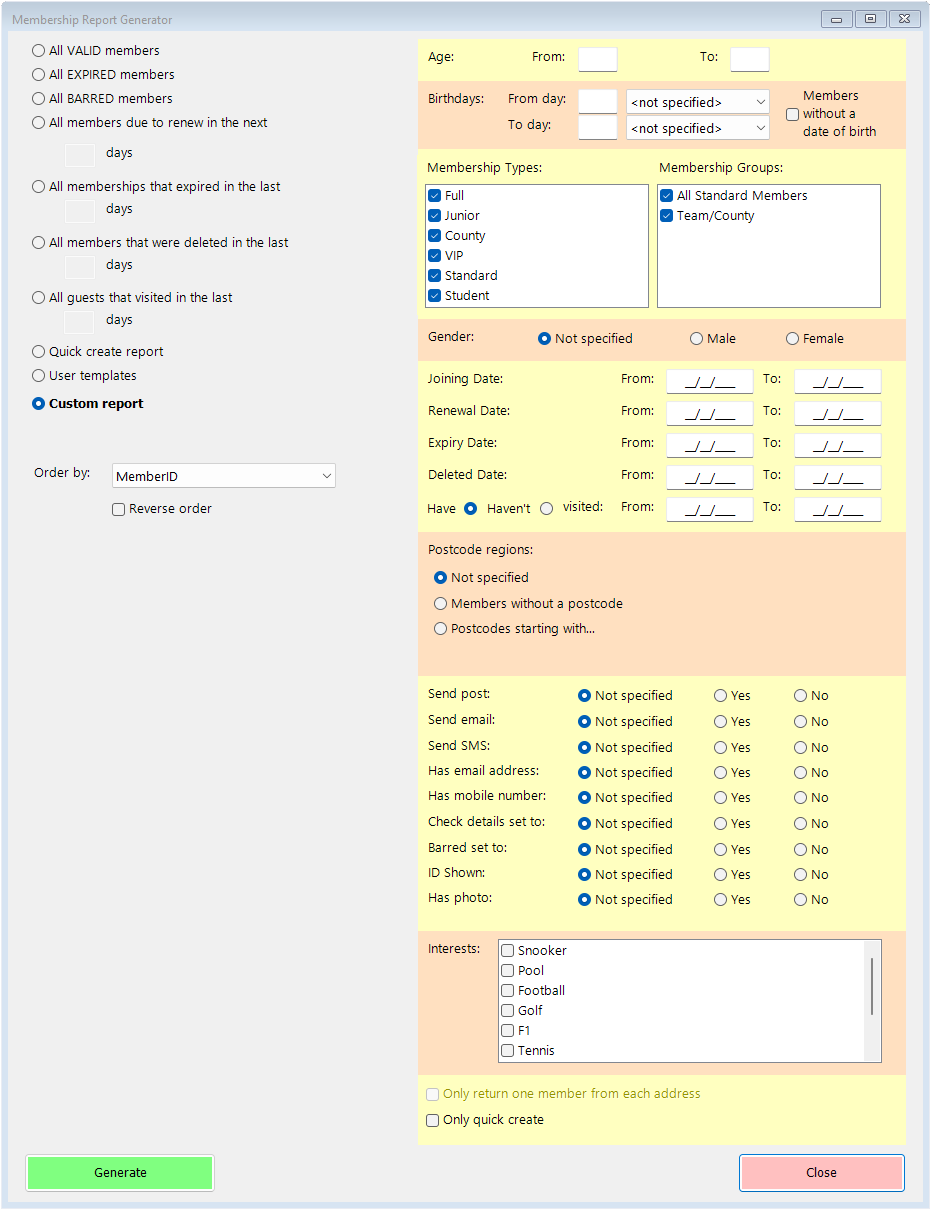
When you first open the form, it will default to the Custom Report option as shown in the image above. This then allows you to filter the member records that will be returned according to various different fields. You can set values for any number of these fields in combination;
- Age – you can select an age from, to or both. Only members whose age as calculated from their recorded date of birth will be included.
- Birthdays – You can select a ‘From’ day and month and a ‘To’ day and month, and only members whose date of birth falls between those dates will be included. This allows you to email all members whose birthday is in the next month, for example.
- Membership Type & Group – these lists allow you to select or deselect certain Membership Types or Groups, to ensure that only members in those left selected will be returned.
- Gender – you can leave the default selection of Not specified (meaning not specificed as a selection, rather than not specified in their record) or pick either Male or Female.
Next there are a selection of date fields. As with Age, you can select a From Date, a To Date or both;
- Joining Date – if you set this as a criteria, it will naturally require a date range in the past up to the current date as a maximum.
- Renewal Date – again, this will be a historic date or the current day, since this is when the member last renewed their membership.
- Expiry Date – the values you enter for this field can be past, present or future.
- Deleted Date – if you set either of these fields the report will of course only return deleted members, since only they have a deleted date stored. These members will not be included in any other reports (except the specific recent deletion report).
- Visited Date – here you also have a choice of whether the report should return details of members who have visited in the period you set or those who haven’t.
The next section of choices relate to Postcodes. If you’re trying to contact members within a certain geographical area, this section can help. The choices here are;
- Not specified – as with Gender, this means not filtered for here.
- Members without a postcode – this option may be useful if you wish to identify members with incomplete information.
- Postcodes starting with… – this option will display a list which you can populate with as many different postcode starts as you wish.

- To add to this list, click add and you’ll see this prompt;

You can add as much or as little of the postcode as you require here – for example all postcodes starting ‘C’, or all postcodes starting ‘CM3 1Q’.
- To add to this list, click add and you’ll see this prompt;
Next is a section of filters around the choices customers have made about marketing communications. As above, Not Specified means ‘Either’ for these selections, and is the default;
- Send Post – if you’re planning to use the results of this report to send a mailshot via the post, you should tick Yes here.
- Send Email – again, if you plan to email the members identified by this report, GDPR dictates that they must have actively agreed to receive marketing emails from you.
- Send SMS – this too is regulated under GDPR so if you plan to send text messages to the members this report identifies, select the Yes option here.
- Has email address – this option is useful for filtering out members without email addresses if you plan to send an email out.
- Has mobile number – similarly, you can only really send a text message to a member if they have provided their mobile number.
- Check details are set to – the check details field is intended to highlight members whose details may be out of date or incorrect. Select ‘No’ to avoid including those members.
- Barred set to – you may wish to exclude members who are barred from any communication. If so, select ‘No’ here.
- ID Shown – if you want to ensure that a member has proved their ID before sending them marketing messages, select ‘Yes’ here.
- Has photo – as above, if you only wish to include members whose membership record is complete including a photo, select ‘Yes’ here.
Next you can filter members by the interests they have ticked on their membership record. You can add interests in Membership>Membership Settings on the Lists tab. Select the Interests radio button. Naturally only members created or edited after you add an interest will be able to have that interest selected in their record. This list can scroll if you have more than 6 interests to choose from.
Finally, there’s an option ‘Only quick create’ to only include members whose record has been created using the quick create option. This is so that you can identify those members whose records only have the basic details stored and so need to be completed on the system to remove their Quick Create status, but filter them using the previous options.
In addition to the custom report, there are some preset reports that you can choose to generate. These are listed on the left as radio buttons, and all fullfil specific purposes relating to membership and renewals etc. These are as follows;
- All VALID members – this report returns a list of every current member.
- All EXPIRED members – this report shows all members who’ve not renewed, regardless of how long ago they were members.
- All BARRED members – a list of all members who’ve been marked as barred.
- All members due to renew in the next n days – you can set as long or short a period as you wish for this option, which will provide a list of members whose renewals will shortly be due.
- All memberships that expired in the last n days – again, you can set any period you wish for recent expiries.
- All members that were deleted in the last n days – as with the option to set a deleted date in the custom report, this is the only type of report where you can view details for deleted members. Again, you can choose any number of days.
- All guests that visited in the last n days – rather than members, this report provides information recorded for guest visitors, and again you can report on any number of days going back.
- Quick create report – this is a custom report to highlight all members created using the quick create function whose details still need to be completed.
- User templates – when you have created a custom report, you have the option to save it as a template for future use, which you can do here. When you select this option you’ll see this screen, with any saved templates available to be selected;
 You can also edit or delete an existing template from here.
With all reports you can choose how to sort the results using the Order by drop-down. MemberID is the default but you can choose from;
- Member ID
- Member Number
- Card Number
- First name, then Surname
- Surname, then First name
- Age
- Membership Type
- Membership Group
- Joining date
- Expiry date
- Renewal date
- Deleted date
There is also the option to use ‘Reverse order’, so Z-A rather than A-Z, newest to oldest rather then oldest to newest etc.
Once you have made your selection of report type or criteria, and chosen the desired sorting order, simply press ‘Generate’. Your report will be built and a list of members created. The report will always have every avaiable field shown, even if they’re hidden in your membership form setup. These are as follows;
- Member Number
- Card Number
- Member Type
- Member Group
- Title
- First Name
- Surname
- Gender
- Date of Birth
- Spouse
- Address
- Postcode
- Home Phone
- Mobile Phone
- Work Phone
- Email Address
- ID Shown
- Notes
- Fee Paid
- Send Texts
- Send Post
- Send Email
- Check Details
- Joining Date
- Renewal Date
- Expiry Date
- Deceased
- Photo
- Introduced By
- Barred
- Quick Create
- Handicap
- Interests
- Deleted Date
- Deleted By
- Loyalty Points
- Account Balance
The report displays like this;
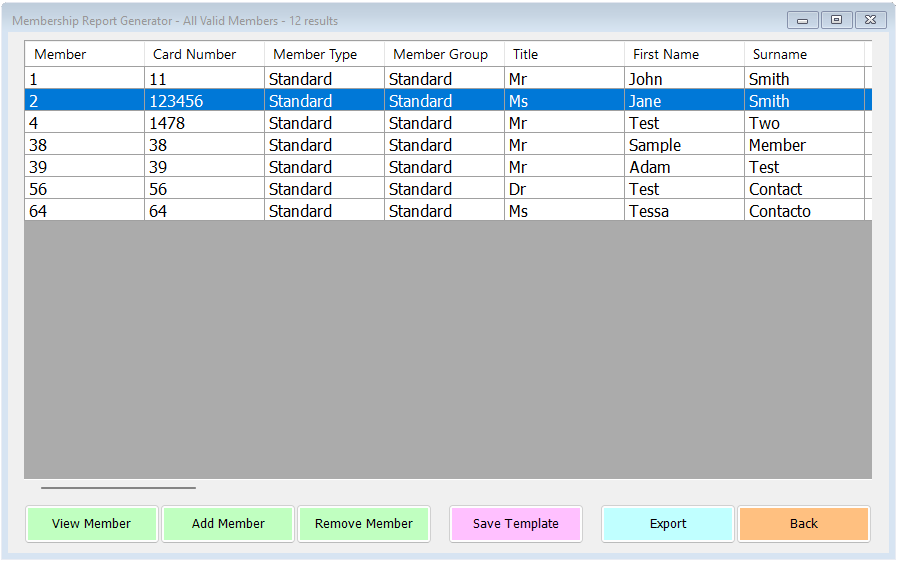
At the bottom of this form you can see various buttons that allow you to work with the data. View Member lets you view the selected member in the normal membership form, but with scroll options that will allow you to move back and forward through the selection.
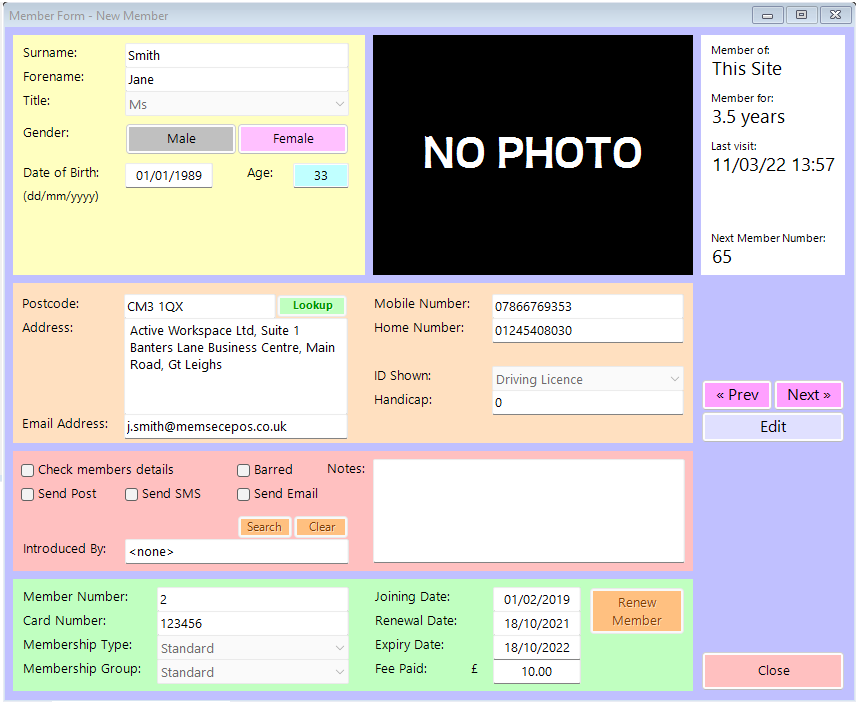
You can also edit the member by clicking the Edit button here. You’ll then be able to amend details and Save prior to working further with the report.
Add Member allows you to include in the list somebody who hasn’t met the criteria for the selected report, whether it’s a custom report or one of the standard lists. You’ll see a search screen, and matches will appear for whatever you type. Once you have found the required member, click Add Member at the bottom of the screen and they’ll be added to the list. If they’re already in the list, their name will be selected and you’ll see a message to that effect.

Remove member allows you to take members out of the list even though they match the chosen criteria. You’ll be asked to confirm that you wish to remove them;
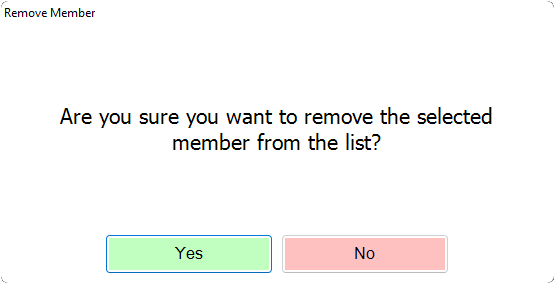
If you answer yes the selected member will be removed from the list. You can then add them back in if required using the Add Member option.
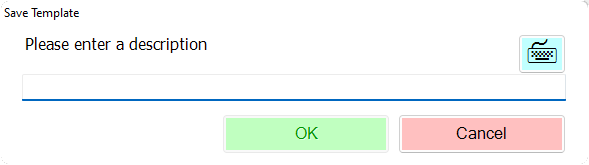
Next to the green member edit buttons is the Save Template button. This is really only applicable to custom reports, though there’s nothing to stop you from saving any of the standard reports as a new template and then editing them to your requirements. All that’s required for saving a template is a name, which you’ll be prompted to enter.
Next is the Export button, which is where the real power of the Membership Report Generator lies. As with all reports in Memsec7, clicking the Export button provides a number of options, though here there are more than usual;
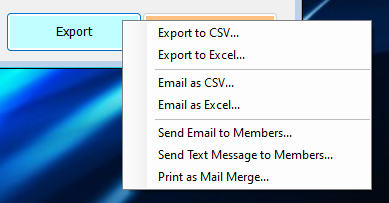
As usual, there is the option to Export the list to a CSV (Comma Separated Values) file, or an Excel spreadsheet. Again as usual, these can also be emailed rather than saved locally.
The last 3 options here are where you’re able to use the list of members in order to send them marketing material.
Send Email to Members
This option provides a means of sending an email shot to your selection of members. You’ll be presented with a screen like this;
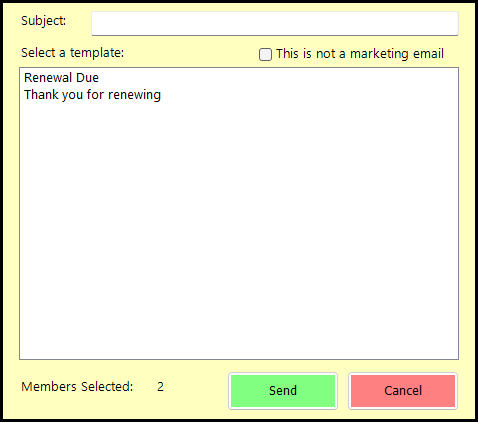
In order to send an email in this way you must first create a template, which you can do under General>Email Settings on the Templates tab, Membership selection. For more about this, see our help page here.
You can see at the bottom of this template selection screen the number of members selected. This might differ from the number of results in your overall report, as you may only send marketing emails to those members who’ve explicitly agreed to this. If the email you want to send is not a marketing email, you can tick the box at the top to signify this, and the number of members selected will most likely increase to include all members in the list with an email address.
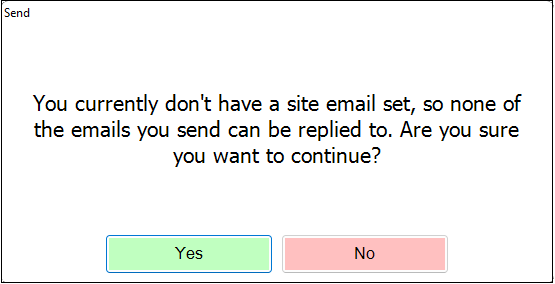
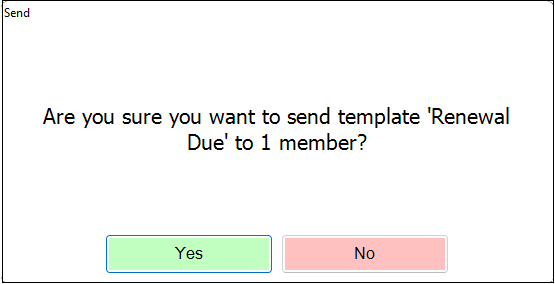
All you need to do once you’ve selected the relevant template is enter a subject line for the email, then click ‘Send’. You’ll see a number of prompts, as shown below. Naturally if you answer No to any of the questions the process will stop.
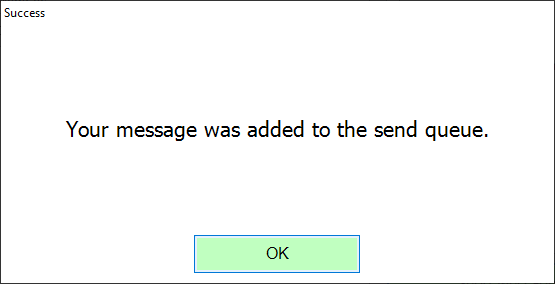
You will be able to view the progress of the emails in General>Email Settings on the Queue tab.
Send SMS Message to Members
This option is similar to the email send, but rather than pre-prepared templates you can type the message you wish to send directly into the form that appears.
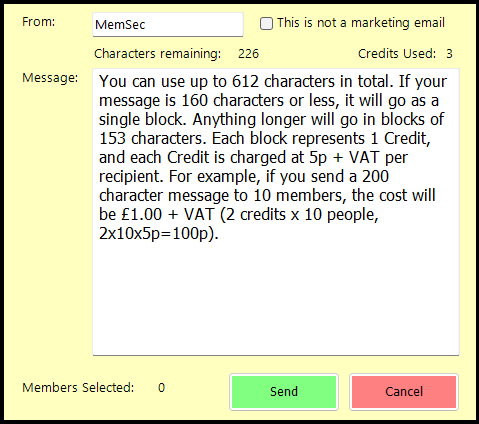
Your site name, or the first 11 characters of it, will be shown in the From box but you can change this if you wish. Please note that spaces aren’t allowed and only 11 characters can be used. As with emails, you can tick to say that this isn’t a marketing message, and the number of members selected at the bottom will change to show all those with mobile numbers stored.
As you type the message you’ll see the character count decrease, and each time you go over the character threshold the Credits Used count will increase.
Once you have written the message, just click Send. You’ll be asked to confirm that you want to send the number of messages and the overall cost;
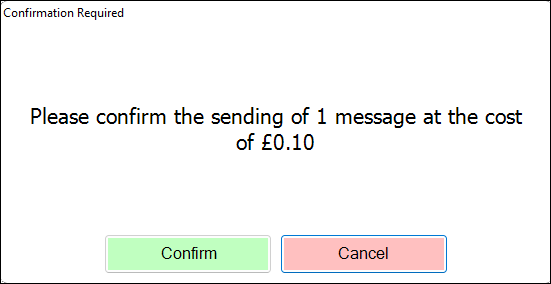
Clicking confirm will send the messages straight away.
Print as Mail Merge
This option requires an A4 report printer to be available to print to. It uses the same templates as the email option, but produces paper copies rather than electronic messages. As such, you should take care to use templates without coloured fonts or images included unless your printer will support colour and you have plenty of ink! The template selection screen looks like this;
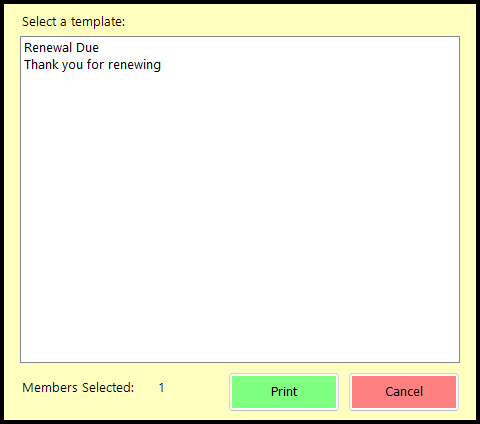
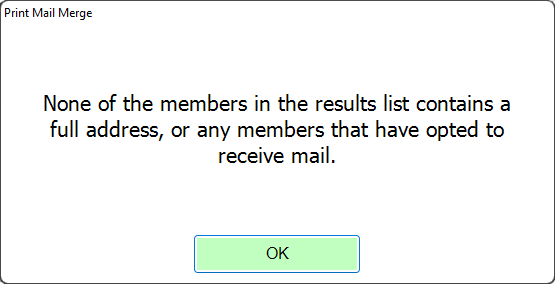
There’s no need to distinguish between marketing and non-marketing messages, as only members who’ve agreed to receive mail will be included in the merge run, and the number of members the mail merge will be printed for is shown at the bottom left. If there are none, you’ll see this message;
Assuming you have at least one match you’ll see the template selection screen, just select the template you want and press ‘Print’. You’ll see a message confirming that the job has been sent to the print queue.