
Once the date range has been set as indicated on the main How To: Promotions page, clicking ‘Next >>’ brings you to the item selection screen. For combination promotions however that screen is irrelevant since item selection is more specific for this type of deal. Therefore click ‘Next >>’ once more and select the Combination Deal button at the top. The screen will change to appear as below.
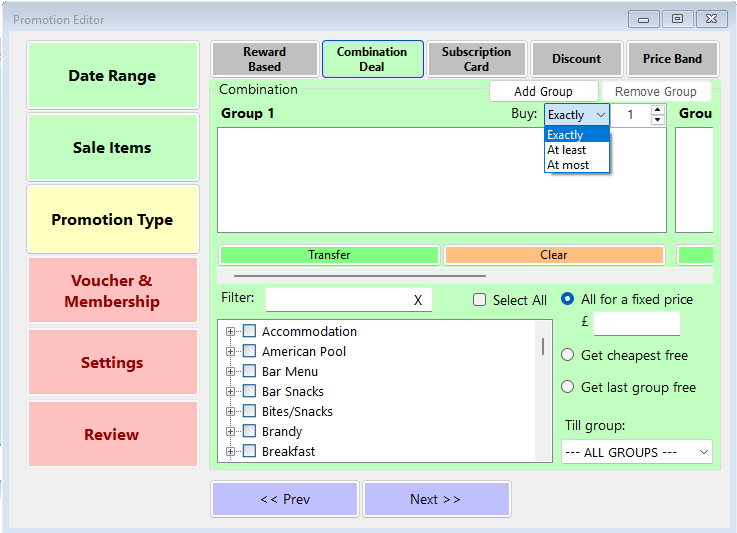
A combination deal has 2 or more separate groups of sale items. There can be as many as 9 different groups but in practice 2 or 3 are usually used. To add another group click on the ‘Add Group’ button at the top of the screen. To remove the last group click the ‘Remove Group’ button.
Each group also has a quantity of items required to qualify for the offer. For each group, you can select whether that quantity is the exact number or a minimum or maximum by selecting Exactly, At Least or At Most from the drop-down just above the group list, marked ‘Buy’.
Then set the relevant number by either over-typing the existing number or using the up and down buttons to the right. Normally the default of ‘Exactly’ will be used but if required, ‘At Most’ would put a limit on the number of items (for example, if you were happy to give away up to 3 items in the last group), while ‘At Least’ might be used for deals such as a Bottomless Brunch, where the customer will receive at least 2 free items.
For combination promotions involving table play, the Buy number should equate to the number of minutes of play; for example, a two-hour deal would need the Buy number to be set to 120.
To populate the groups, identify the required items one group at a time in the sale item list at the bottom of the screen. Typing part of the item name in the search box will filter the contents of the list. Once all the items needed for a group are ticked in the list, click the ‘Transfer’ button underneath that group. To remove all items from a group simply click the ‘Clear’ button beneath the group. To remove an individual item from a group, highlight it and right-click. This will show a separate menu.
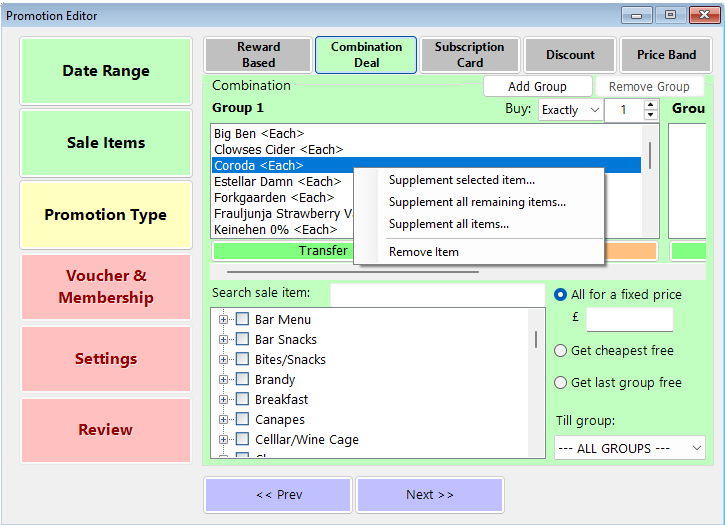
To remove the item from the group, select the Remove Item menu option. The other options relate to supplements. Supplement selected item gives the option to alter the price of the selected item within the offer. This can be used to increase or decrease the overall price charged for the combination, since it allows both positive and negative amounts to be entered. Supplement all remaining items will allow you to add a supplement to any items in the selected group that don’t yet have a supplement, and Supplement all items allows you to add a single supplement value to all items in the group, overwriting any that have previously been set.
Combination deals most commonly offer the combination for a fixed price. This is the default option chosen and the fixed price should be entered in the box on the right hand side of the screen. There are two alternative options. The first is to offer the cheapest item in the combination free. If this version is used it doesn’t matter which group the cheapest item is in. The third option is ‘Get last group free’, which will discount all the items in the last group to zero when the promotion is applied.
The final option on this screen applies where more than one till group is configured within a site. In that circumstance a choice can be made whether to apply the offer in all Till Groups or an individual group.
For a further exploration of how combination offers can be used see also our page on How to Set Up Set Menus.
Combination promotions by default apply automatically. If you want to apply an offer selectively it should be set to require a voucher. Read our How-To: Voucher Promotions page to find out more.
The remainder of the configuration of a combination promotion is identical to other types of promotion, as described on the main How-To: Promotions page.