Reward based and combination promotions in Memsec7 apply automatically by default. Sometimes though it’s necessary or desirable to add some control to when a promotion is used.
You can achieve this extra control by marking a promotion as ‘Voucher required’. This option is always applicable to Discount and Subscription Card type promotions. Price bands cannot be voucher controlled but may be linked to membership.
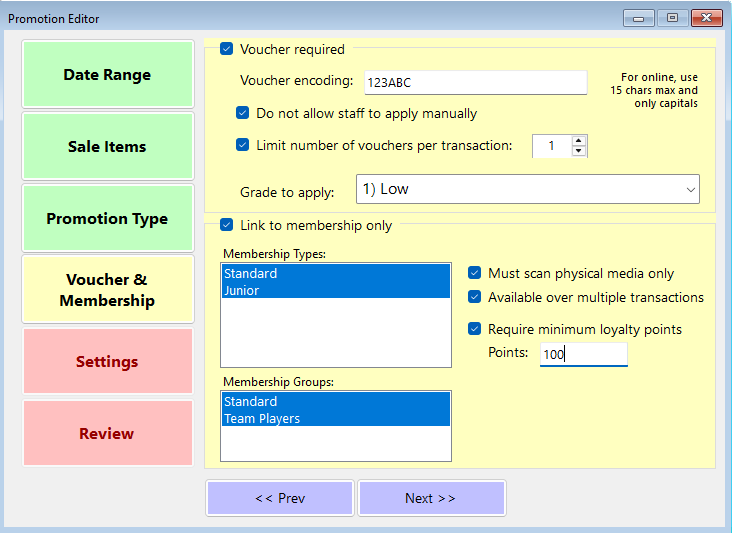
Although you may well issue physical vouchers via local advertising or leafleting etc, the system doesn’t require one for a promotion to work in this way. If there is a physical voucher the promotion can be set to have a voucher code. This code can be typed in by staff unless the next tick box is checked, in which case the code will only be accepted if it’s swiped via a magnetic stripe card or scanned using a barcode scanner.
A limit can be placed on the number of times a voucher offer can be applied to a single transaction. Most commonly this would be set to just one if it is used at all. For a BOGOF type offer this would ensure that only one item is given away in each transaction.
In order to provide even more control there is also now an option to select the minimum staff grade able to apply this voucher. This will default to the lowest grade but higher grades can be selected from the three buttons Low, Medium, High or where more staff grades are configured, a drop-down box as shown above.
If you have membership enabled you can specify that a voucher promotion is linked to membership only. This can be restricted to specific membership types or groups and means that unless a member in one of the selected types or groups has been assigned to the current sale, or to the tab being viewed, the offer won’t appear in the list shown below.
For greater control, you can also choose to restrict application of a membership-linked promotion to the scanning of physical media only – in other words, the member must present either their membership card or a QR code on their phone app, and if their name has been applied to the sale via a text search the offer won’t apply.
Offers linked to membership assignment can be set to apply over multiple transactions – for example, a coffee shop ‘get your 10th drink free’ type of loyalty offer. Just tick the check-box to make an offer apply this way rather than on a single transaction or tab.
Finally, for sites that have a loyalty scheme where members can earn points, it’s now possible to restrict a promotion to only members who have a certain minimum level of points accrued. This provides for effective ‘levels’ of loyalty customer, with no limit on the number of different offers that can be applied according to increasing minimum point levels. (e.g. 100 points minimum in a 5% off promotion, 200 points for 7.5%, 300 points for 10% etc.). Please note; promotions should be saved in priority order from highest point requirement to lowest.
To get a voucher promotion to work on a till staff need to select it in one of two ways. If the items are already on a tab they should press the ‘Apply Voucher’ button on the view tab screen. If there isn’t a tab then on the payment screen there will be a ‘Voucher’ button between the payment method buttons and the Put On Tab button. Pressing either of those will display the screen below, listing the voucher promotions available at the time.
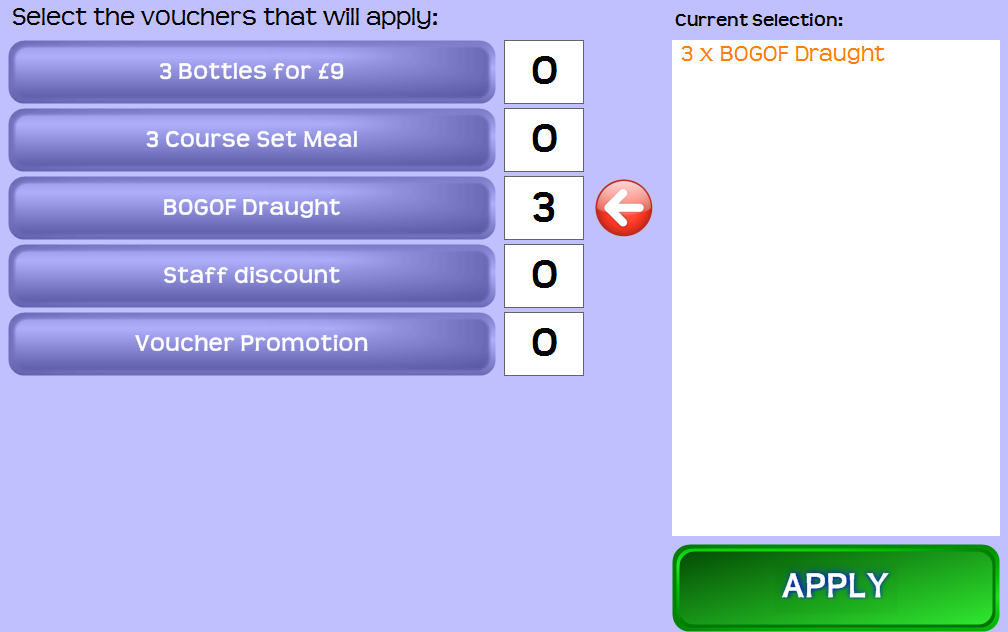
Press a voucher name to increase the number of vouchers of the selected type to apply. As well as the number box next to each button, the total selection is listed on the right hand side. As this suggests you can apply multiple instances of a promotion, subject to any limit set in the configuration screen above. If that limit is reached the button becomes disabled. Similarly, the button will be disabled for all users whose grade isn’t at least as high as that set in the ‘Grade to Apply’ section in the top image. Different vouchers can be selected simultaneously and, so long as they apply to different items in the current tab or transaction, can all apply.
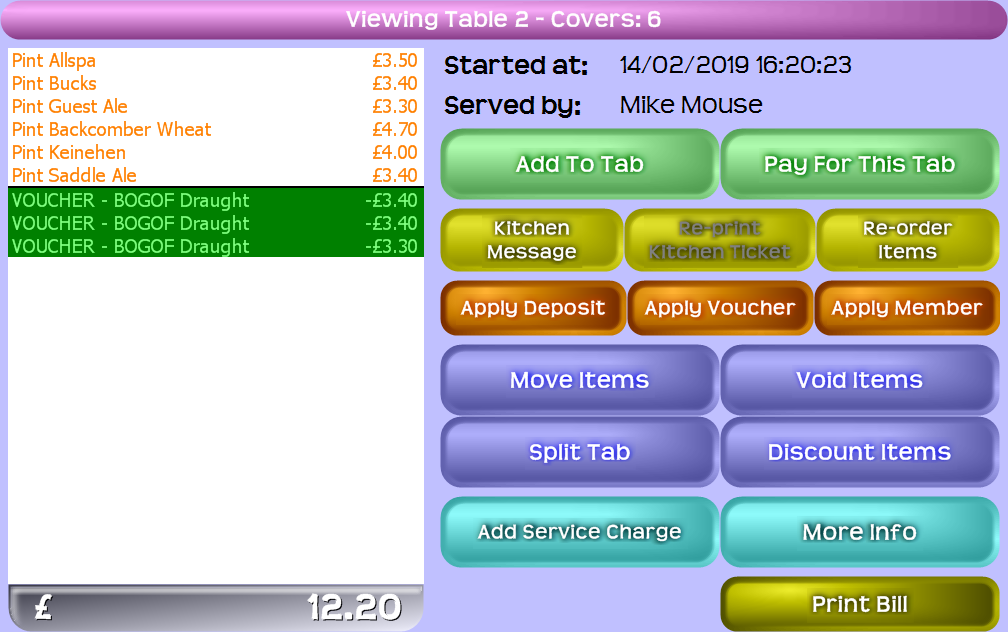
Clicking on ‘Apply’ will take the selected voucher(s) and apply them to the current tab or transaction. In the case of a tab, the voucher will appear as an extra line in the tab, with the associated discount. This means the bill can be printed to show the effect of the voucher, leaving just the balance payable.
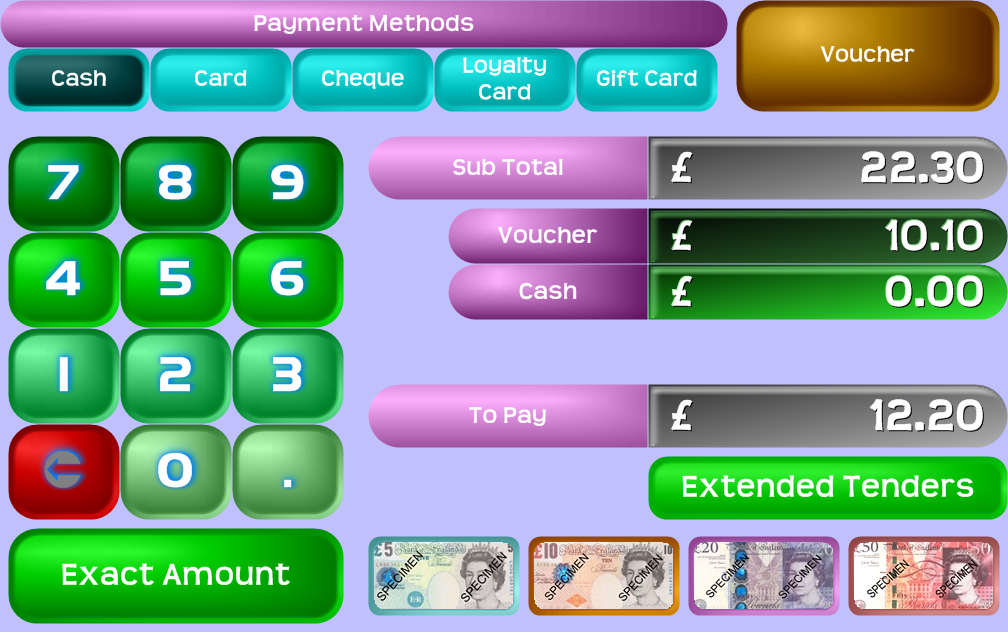
In the payment screen, the amount of discount will show as a payment line, leaving the balance to be paid. This is also how a tab with a voucher applied will appear in the payment screen when it’s paid off.
When more than one voucher is used there’s a choice of how they’re displayed on a receipt or bill. By default each separate voucher has a line but if you’d rather reduce paper usage you can choose to amalgamate them into a single line. You can find this option under Tills>Till Settings under the Global tab. There you’ll see a tick box marked ‘Collate voucher tenders’.
To find out more about vouchers and other promotions, click to return to the main How-To: Promotions page.
